Now Reading
Complete Guide to cPanel
 | Updated: May 16, 2020
If you're about to build your first website, chances are good that you're feeling overwhelmed. Not only do you need a domain name and a web host but also you need to know how to create, update and maintain your website.
It sounds daunting, but it may be helpful to know that you'll find all sorts of tips and tools along the way that make the whole process approachable and even fun. One of those tools is cPanel.
Many web hosts make cPanel access available to their customers. That's because this interface generally is easy to use, flexible and friendly enough to be appealing to even the newest of new webmasters.
cPanel enables your web host to more effectively manage its servers, which also benefits your website in terms of performance, functionality and security.
For example, Siteground's cPanel access ensures that your website is fast, reliable and stable.
With your cPanel login, you'll be able to do everything from setting up emails for your website to creating databases.
First, it's essential to answer the basic question: "What is cPanel?"
Getting to Know cPanel
cPanel debuted in 1996, a product of Speed Hosting, Webking, VDI and cPanel, LLC at various points in its history. It is written in Perl, and it operates on Linux, Android and iOS.
Effectively, the cPanel company provides a graphical user interface, or GUI, that is a web hosting control panel.
In fact, cPanel is just a shortened way of saying "control panel." The entire point of the program is to give webmasters a simplified, straightforward way to manage their website.
cPanel is an incredibly popular interface among webmasters. This is because it readily displays important metrics that let you know how your website is performing. Additionally, it provides access to numerous modules that put you in control of most of the operations that are critical to your website's functionality and success.
cPanel Modules
When you use your cPanel login, you are immediately shown a dashboard where you see the main modules of the program are.
As a robust and powerful GUI, cPanel puts you in the driver's seat. If you are the administrator, you have the ability to decide who has access to cPanel and whether or not each user has access to all of the program's tools or to only a subset of these capabilities. This ensures greater security as you can be certain that only you or other trusted individuals have the ability to make significant additions or deletions to your website.
Because you're in the driver's seat, you also may have the opportunity to rearrange how your cPanel interface looks and which modules are most prominently displayed. Remember, your specific web host may or may not limit your abilities to customize the interface. With web hosts like HostMonster cPanel access comes standard so that you can really make your website your own.
Depending on your web host, you may have access to all of these modules, access to only a portion of them or access to additional modules that aren't listed here.
As an example, not all web hosting packages include email addresses. This means that you likely won't see an Email module on your cPanel dashboard.
Check out the definitions for each module below!

File modules make it possible for the webmaster to upload and manage files directly from cPanel without needing an FTP client. This may considerably streamline the process. Within this module, you also may set privacy levels and create backups.
If you do use an FTP client, this is the module where you will find sub-modules for FTP accounts and connections. An FTP client refers to a "File Transfer Protocol". These programs are designed to make it easier to upload and manage files.
Some webmasters find that they prefer to use an FTP client in addition to or as an alternative to managing files in cPanel. However, part of the beauty of cPanel is that you don't have to rely on a third-party FTP client to easily upload, read and retrieve files when you have cPanel. The choice regarding whether or not to use an FTP client is really up to you.
cPanel even makes it possible for you to use your favorite FTP client in conjunction with their program, giving you the ultimate in versatility.
Within the file modules, you'll also discover the ability to monitor your disk usage, adjust the privacy settings on your directory and control images in addition to other functions. You may spend a great deal of time with the file modules when you're working on maintaining or updating your domain.


cPanel Isn't the Only Control Panel
CPanel is a familiar program for the vast majority of experienced webmasters. It's efficient and intuitive, making it an excellent choice for the beginning website owner. However, it also is powerful, providing a multitude of advanced capabilities for those users who have a sophisticated knowledge of website management.
Nonetheless, cPanel is not the only web hosting control panel. If you find that you're not comfortable with the interface, then it may be wise to seek an alternative.
Pros
- User-friendly
- Widely used and trusted
- Efficiently saves time and money
- Quick learning curve
- Tutorials and customer support are widely available
- Software auto-installers make changes and updates a breeze
Cons
- Easy to accidentally alter critical settings and preferences
- Variety of features may overwhelm new users
- Rarely available with free hosting plans
- Web hosts are not always diligent about providing the latest cPanel updates
What Will You Do with cPanel?
CPanel enables you to perform all sorts of operations quickly and easily. This is the place to be if you want to build a new database for your content management system. When it's time to back up your website, you'll go straight to the cPanel.
Installing WordPress, uploading files and configuring emails all are accomplished at the cPanel as well.
cPanel also handles a multitude of other functions, but true beginners just need a roadmap for getting started. Now that you've had the basic tour and understand how cPanel can be critical to the success of your website, it's time to get down to the nuts and bolts.
Let's start with the most basic of operations: Logging in to cPanel for the first time.
Logging into cPanel
Now that you've selected a web host and chosen the right package, it's time to log in to your account so that you can start building your website.
Most web hosts allow new users to choose a username and password or PIN. Alternatively, you may receive an email from your web host that contains a temporary username and password.
Sign in to your web hosting account. If you have not already chosen your own unique username and password, take a moment to update this in your preferences or settings.
Next, look for the cPanel link on your web hosting dashboard. Frequently, this link will be located on a tab that is labeled "My Accounts," "Advanced" or "Preferences." If you have Namecheap cPanel login, then details are a part of the Quick Start Guide.
If you aren't able to locate the link, contact customer support at your web host for assistance.
If you need assistance with anything related to this web application, then you might want to consider consulting any of the cPanel tutorials in their website. They feature an incredible amount of videos that can teach you everything you need to know.

Your First Look at the cPanel Interface
After entering your cPanel login, you'll be taken to the dashboard. Typically, it looks something like this:
Siteground cPanel Appearance
Default cPanel Appearance
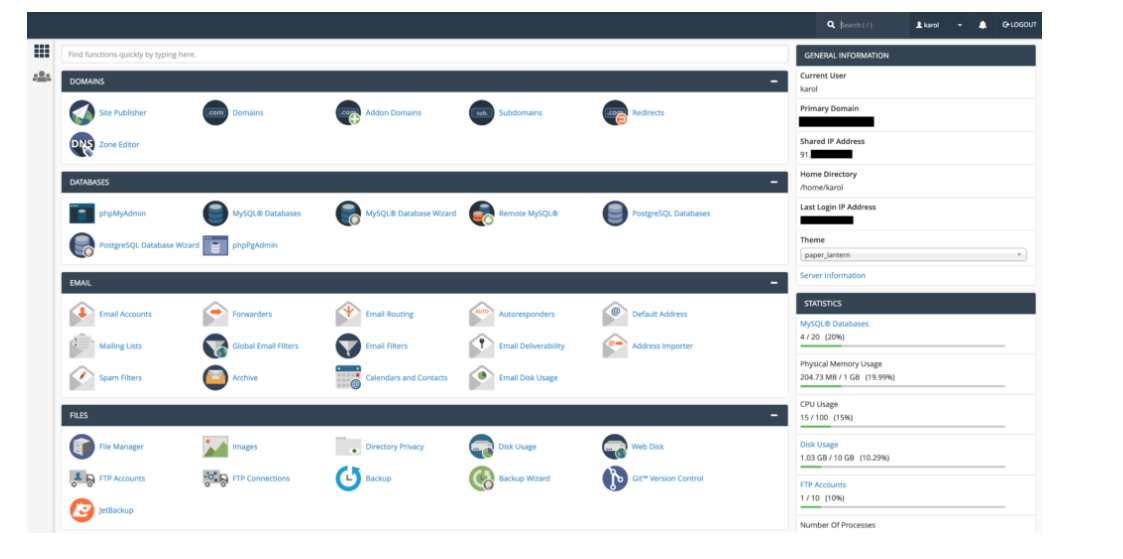
Don't be alarmed if your dashboard doesn't look precisely like this. Your web host may have made its own alterations to the appearance. Additionally, cPanel is equipped with a few different themes that make the dashboard look different. Which theme you use is totally up to you. If you want to change it, just go to the Preferences module and click on "Change Style."
Navigating the Dashboard
New users will find that navigation is easy. The top-right corner of the screen shows your username, any alerts or messages, a logout link and a search bar. You may find the search bar particularly useful as it allows you to streamline the navigation process.
cPanel has a second search bar at the top of the page that provides an alternative format for search results. Which search bar you use depends upon personal preference.
A left-hand sidebar features a shortcut to the home screen as well as shortcuts to statistics, the dashboard where you'll find the most commonly used links and user management where you can manage the users on the cPanel account.
If there's a particular section on the home screen that you don't typically use, just click on the minus sign on the top-right corner of each section. This minimizes the section, and you only have to click on the plus sign to restore it.
It's also possible to drag-and-drop your favorite sections so that they are at the top of the home screen.
Setting Your Preferences
You can not only change the style of your cPanel interface in the Preferences module but also you can update your password and manage the account users.
The first thing that you may want to do upon logging in is to change your password. Just click on the Password & Security module to bring up the Change Password screen.
Fill out the form, taking care to choose a password that is long, complex and unique. Include capitals, numbers and special symbols to make it harder for hackers to break.
cPanel does provide a password generator if you need assistance coming up with a virtually unbreakable password.

Another critical task to perform in the Preferences module is providing an email address that cPanel can use when it needs to reach you. Never use your domain email for this. In the event that your website and your domain email system are compromised, cPanel will need an alternative way to reach you.
Just click on "Contact Information" to bring up this form:
Just enter your email address and click "Save". Notice that cPanel automatically selects numerous "Contact Preferences" on this screen. It's sensible to leave these as they are so that you're always in the know.

Adding New Users
While you may be the only person who can upload or delete items, someday a partner or employee may need to access the website's cPanel.
If so, you'll click on "User Manager" in the Preferences module.
A screen pops up, showing you all current users and their permissions.
Each user's account features three icons. When these icons are in color, they are active. Grayed-out icons indicate that they are inactive.

These icons are an envelope for the user's email account, a truck for an FTP client and a disk icon indicates whether or not the user has access to web disk services.

Any of the existing users can be edited here. If you need to add a user, click the "Add User" button at the top right-hand corner of the screen.
This brings up a screen where you can add the new user's relevant data.
In the following "Services" section you can set the new user's ability to use email, an FTP client and their web disk access.
For the email and FTP services, you can set a limit on how much data the user can access. This ensures that they don't overload the website's memory resources.
Managing Your Domain
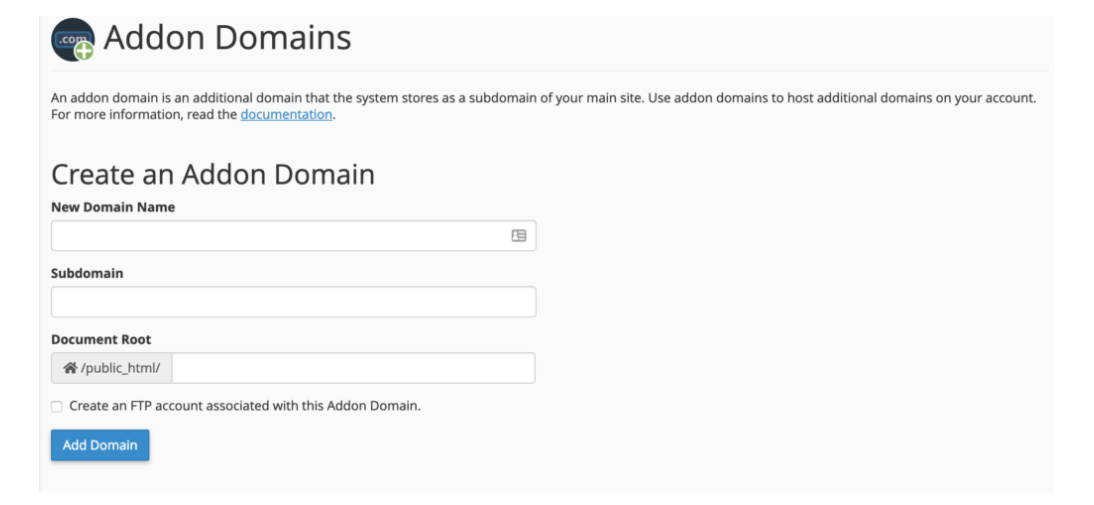
You probably just purchased a domain. This means that you now have to add this domain to your cPanel account. In the Domain module, click "Addon Domains".
Here, you'll enter your domain name without "www." The subdomain and "Document Root" boxes will automatically fill when you enter data into the "New Domain Name" box.
Click "Add Domain" to complete.
If you need to edit or remove a domain, you'll find that functionality on the same screen. Just visit the "Modify Addon Domain".
Because cPanel automatically gives your new website a subdomain, you may want to redirect this subdomain to take visitors directly to your main website. To do this, visit the "Subdomains" link in the Domains module.
Click on the "Manage Redirection" link to ask cPanel to redirect any visitors to your subdomain to your main website.
You also have the option of creating subdomains. For example, most websites have blogs. You can make your blog a subdomain with the address "blog.yourdomain.com."
Using the same subdomains screen, visit the "Create a Subdomain" section. Name your subdomain, then click on "Create".
Setting Up Your Email
In the Email module, you'll find numerous tools to set up and manage email accounts.

Click on the "Email Accounts" link to create your new email. In the "Email" box, enter your name or a generic title like "info". In the "Domain" box, use the drop-down box to choose your domain. Then, choose a password.
Use the "Mailbox Quota" field to set limits on how much server space this email account can occupy.
Click "Create Account", and you're done.
Accessing Your Email
When you want to send or receive an email, you must set up your email account with an email client such as Outlook, Apple Mail or Gmail. Alternatively, you may use webmail.
To use an email client, navigate to the "Email Accounts" tab, then click on "Access Webmail." Scroll down to "Mail Client Automatic Configuration Scripts" where you'll see a list like this:

Then, locate your email client of choice, click on it and follow the instructions for installation.
Alternatively, you can click the "Access Webmail" link, and then select one of the available webmail applications. Choosing one of these options as your default immediately takes you to your inbox.
Enabling Spam Filters
Click on "Spam Filters" to ward off junk mail. Many web hosts automatically configure spam filters to reject most unwanted emails. In fact, your choices may be limited in this module.
However, you may want to double-check the setting for the "Automatically Delete New Spam" option. This may seem like a streamlined option, but it can be a mistake. Filters sometimes categorize a good email as spam. If your filter is set to automatically delete anything that's spam, you might miss out on some critical messages. Leave this option off or turn it off if your web host allows you to.
Working with Files
Whenever it's time to upload files or backup your website, the Files module is where you'll go. Click on "File Manager" to see all of the files associated with your website.
Use care when in this module. Any changes you make, like an accidental deletion, can be impossible to undo.
Otherwise, this is a straightforward interface. To add a new folder, click on the "+ Folder" link. Name the file, give it a home and click on "Create New Folder".
To upload a file, such as an image, click on the "Upload" button. You can drag and drop the appropriate file or browse for it on the local drive.
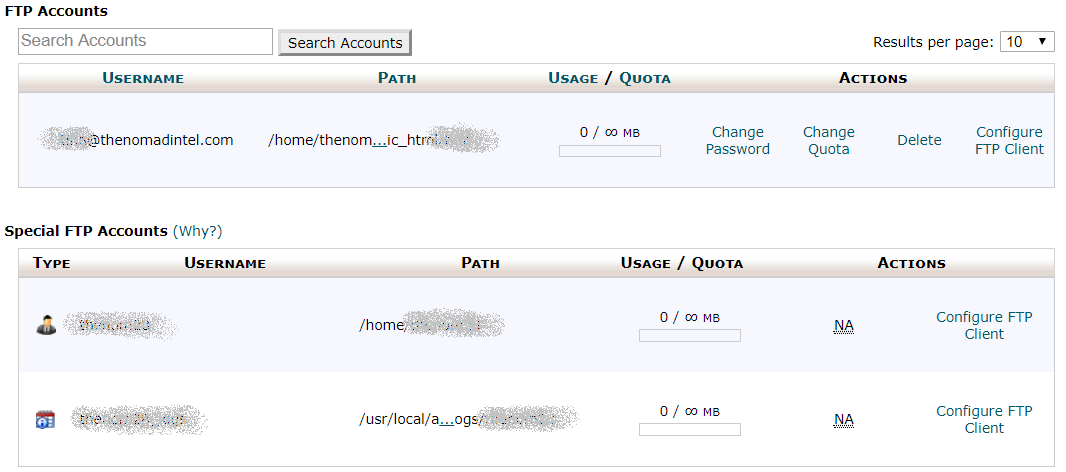
If you have an FTP client, you may be able to access it here. Create a new one by clicking on the "FTP Accounts" link. Use the form to fill in your login, domain and directory information. Include a password, and consider keeping the quota on the FTP account set to unlimited so that you can work with large files.
Working with Databases in cPanel
For users of WordPress cPanel access is indispensable. Content management systems like WordPress use databases to store everything like blog posts and user data.
If you'll be using a content management system, then you'll have to create at least one database. Most users will most frequently work with MySQL Databases.
To create a new database, click on the "MySQL Database Wizard" link. Name the database in the field, then create database users, assigning each one a password and privileges. The privileges include selections like alter, create, delete, event and index. You may select "All Privileges" if this is appropriate.
If you go back to the home screen and then click on "MySQL Databases" in the Database module, you can rename or delete each of the databases. This also is where you can make changes to the users and their privileges.
One-Click Installation
One of the major advantages of using cPanel is the ability to install software with a single click. All you have to do is go to the Software module. Click on the "Solfaculous Apps Installer".

You'll have hundreds of options from which to choose. Use the column on the left-hand side of the screen to narrow down your choices to specific items.
To install any of these options, click on it. Read the information about the program, and then click "Install Now" if you want to download it.
You may have to give Softaculous additional information before installation is complete. For instance, you may have to select the version that will be installed. It's always best to go with the latest one to ensure that you get the best available version.
You also may need to choose the domain to which the download will be added. If you're downloading a content management system, then it's wise to choose a relatively complex admin username and password so that hackers can't break into your website.
Performing Website Backups
Now that you've put so much work into your website, you want to ensure that you protect your data with a back-up. If you have ever dealt with a PC that crashed and burned, leaving you with multitudes of missing files, then you understand how critical this step is.
Your web host may handle backups automatically, which means you don't have to do this step. Check with your web host about cPanel support to determine whether or not you are responsible for performing backups.
If you do want to back up your website, go to the Files module and select the "Backup Wizard" link. Next, click the blue "Back Up" button to begin the operation. Choose whether you want to do a full back up of all files or a partial backup of selected items.
Download the back up when it is complete.
cPanel Metrics
In the Metrics module, you can find statistics that reveal your website's performance. Click on "CPU and Concurrent Connection Usage" to discover how much your website is using in terms of machine resources. The "Bandwidth" button shows how much bandwidth you're using while the "Visitors" option tells you the number of people who have viewed your website.
Use the statistics that you find here to help you determine how efficient and effective your website is. This may help you to make alterations that guide even more visitors to your site.
Final Thoughts
When it comes to interfaces for managing websites, cPanel is one of the best. Although what you're seeing could be slightly different, the modules and how you use them as explained here remains to be the same with other themes.
cPanel features a straightforward layout that isn't too overwhelming to novices yet also boasts plenty of advanced capabilities. Consider choosing a web host like InMotion Hosting or Siteground that gives you cPanel access to manage your website.